Monday, September 23, 2013

French Bread

Here's a true story.  Last year my husband took our two oldest boys on a 'mancation' to hike around in Colorado.  The boys called me from the road laughing like lunatics, barely able to contain themselves, talking right over the top of each other to be the first to tell me that their dad had bought them white bread.  As if he had just bought them each a 24-pack of Mountain Dew.  Liter-size.  As if he said "let's skip the Rockies" and let them spend a day at mini golf with bumper cars and an arcade with an unlimited pile of quarters.  As if they had just broken every rule about using a fork and napkin and saying 'excuse me.'  My kids are crazy like that.  Total rebels. 

But it's true, I'm a little freakish about bread.  I never buy white bread.  Ever.

Ev-er. 

Far better than buying the whole-wheat-no-high-fructose-corn-syrup-no-artificial-colors-no-artificial-flavors-no-dye-no-nothing-bad bread is just making my own.  There is something so homey and so nurturing about making it.  And I can't imagine my kids fighting over the last piece of white bread like they fight over the last pieces of a warm loaf fresh from the oven.  They know good stuff when they have it.

It's true, making bread takes time.  It doesn't stay fresh as long.  Something about the total lack of preservatives, I guess.  Just some yeast, some flour, some water, and a little bit of salt and oil.


And of course, time for it to rise.


Roll it out, roll it up, and brush it with a simple egg white wash for color.


And walla.  A gorgeous loaf of French bread--sans WalMart.  Sans crap you can't pronounce.  


It slices like a dream, and it's super good plain, with jam, honey, or slathered in garlic butter.


Here's the end of that same story.  A few days later, on their weary journey home, whey they were tuckered out from fresh air and hiking and processed meat and white bread, they called me from the road and said "Mom, I really miss your cooking."

Take that, Wonder Bread.

French Bread
Slightly adapted from this recipe from Allrecipes 

1 pkg (2.25 tsp) yeast
1 cup very warm water
3 cups bread flour
1.5 tsp salt
1.5 tsp sugar
3 tsp. canola oil
1 T corn meal
1 egg white, slightly beaten

Pour warm water into a glass bowl and sprinkle with sugar and yeast.  Whisk, then allow the yeast to proof for about ten minutes.  In a large mixing bowl, whisk together flour and salt.  When yeast has risen, whisk in the oil and pour into flour.  Beat on low speed until dough has formed.  If you have a food processor, use the dough hook and allow the machine to knead the bread for about 8 minutes.  If you don't have a food processor, roll up your sleeves and go at it for the same amount of time.  Lightly grease (with butter or canola oil) a large glass bowl.  Form the dough into a ball, place the ball into the bowl, and roll once so all sides of the dough are slightly covered.  Cover and allow to rise in a warm dry location until doubled in size, about an hour and a half.  On a lightly floured surface, press or roll dough into a 9 x 12 shape.  Roll the dough so it forms a 12 inch long log.  Slice three slits into the top.  Sprinkle the cornmeal onto a baking sheet and move the dough onto the cornmeal to prevent it from sticking to the pan.  Brush the dough with the egg white mixture.  Spray a length of saran wrap with nonstick cooking spray, and gently drape the saran wrap--sprayed side down--onto the top of the loaf to prevent it from drying out.  Allow the loaf to rise a half hour.  Preheat the oven to 400 degrees.  Bake the bread for 30 - 35 minutes, or until golden brown.  Allow to cool until warm to the touch, then slice and enjoy!


Wednesday, September 18, 2013

Fruit Salad


If you've had young children any time in the last decade or so, you might have the same issue with this side dish that we do.  I can't utter the words "fruit salad" without someone chiming in with the Wiggles rendition....singing "yummy yummy."  Unfortunately, because a fruit salad is actually made with fruit, they'll sing "yummy yummy" but they won't say it.  My big boys won't touch the stuff.

More for me.

I love to make this fruit salad when we get together with friends because gatherings tend to have carb-heavy fare--meat on a bun, potato salad, pasta salad, chips, dips, cookies, brownies and other good stuff.  It's like bringing a dessert (which I also like to do) that you can't feel guilty about eating.  There's little in it that isn't healthy.  

Chopped apples


chopped walnuts


diced peaches


strawberries


grapes


and Craisins....they add a great texture.


Usually with a fruit salad, the healthy fruit part gets cancelled out by everything that gets globbed on top of it--bad stuff like dressing and candy pieces and whipped topping.  Not so with this.  I use nonfat Greek yogurt with honey and vanilla to sweeten it up.  Check this out.


My aunt and uncle have bees.  A-mazing stuff.


It only looks bad for you!


I could eat this for every meal.  It's a fact that after I make this fruit salad, I do eat it for every meal until it's gone.  And then I want some more.  


You know who else could eat this for every meal?


The chickens.  When they see this little basket, they come running.  Which is pretty funny until they get close.  And then it's terrifying.  That's why I send my children out with it.  I don't like chickens.  You know what else I don't like?


That's right.  Turkeys.  They're big and really ugly.  I'm warning my family that these birds won't last long on our farm.  Thanksgiving is just two months away.  You know what I say about that?


"Roast turkey.  Yummy, yummy...."

I like to torment them sometimes.

Fruit Salad
Dressing borrowed from this Ina Garten recipe

3 Apples, peeled and diced
2 pints of strawberries, diced
3 peaches, peeled and diced
Grapes, cut in half
1/2 cup Craisins
1 small package of diced walnuts (about a half cup)
2 cups nonfat Greek yogurt
2 T. honey
1 tsp vanilla

Amount and types of fruits are entirely optional--use what you like.  Wash and prepare fruit as noted above, adding it to a very large bowl.  In a smaller bowl, whisk yogurt, honey and vanilla until smooth and well blended.  Add to the fruit and mix well.  It is best to serve this within a few hours of when it is prepared.  Though it tastes good the next day or two after it's made, it tends to get a bit watery and doesn't look as appealing!


Friday, September 13, 2013

Midwestern Taco Salad


Have you ever heard of fusion cooking?  It's where you blend one cooking style with another, like Asian-Indian, or Korean-French.  This taco salad is total fusion cooking.  It's Midwestern Mexican.   

Over Labor Day weekend we went to my brother's house in North Dakota, where my precious teeny tiny niece was baptized.  (She's an angel).  My sister-in-law's family all came from Minnesota and graciously brought heaps of good food.  One of those dishes was a taco salad that everyone raved about.  Including me.

So why Midwestern Mexican?  Because it has salad dressing in it, and crunched up chips.  Two hallmarks of a good Midwestern dish.  It's classic casserole meets south-of-the-border.

It's also dang easy.  Some chopped up lettuce...

    
Browned ground beef with taco seasoning.


 Diced red onions.


Some corn. 


And black beans.


 Shredded cheddar jack.  Of course.


And black olives if you like them.


At this point you add Western dressing.  I'm sure that is what made the taco salad I tried at my brother's house so good.  But this is the deal.  I read the nutrition information on the label and totally chickened out.  I couldn't just dump a small bottle of it in.  It's naughty stuff.  So instead I used about a half cup of Western dressing and a cup and a half of taco sauce.  If you don't care about things like fat and calories, then by all means increase the amount of Western dressing and decrease the amount of taco sauce.  You do what's right for you.  It's going to taste better if you use more Western.  It's going to be healthier if you don't.

And here's the silly part.  After all that concern about nutrition, add 3 to 4 cups of broken up taco-flavored Doritos and mix again.


It's a total family pleaser, and easy enough to throw together on a school night after you get home late and the kids are starving.  

It's muy bueno, amigos.  

Yep, you betcha, it is.


Midwestern Taco Salad
Adapted from a verbal recipe shared by my sister-in-law's mom Sandy

1.5 lbs ground beef
packet taco seasoning
lettuce, shredded
1 red onion, diced
2 cups shredded cheddar jack
1 can of corn, drained
1 can of black beans, rinsed
1 can sliced olives
1 small bottle of Western salad dressing--use to taste
1 small bottle of taco sauce--use to taste
3-4 cups crushed Doritos

Brown the ground beef, then add taco seasoning and stir until well combined.  Meanwhile, chop one head of lettuce and place in a large bowl.  Top with ground beef, onion, corn, beans, olives and cheese.  In a separate bowl combine dressing and taco seasoning--you decide how much of each to use.  I used between 2 and 2.5 cups of combined sauce, about half cup of dressing and the rest taco sauce.  It may taste better if you use just one small bottle of dressing and no taco sauce, but more taco sauce and less dressing will be more healthy.  Up to you.  Add the sauce to the large bowl on top of the other ingredients and mix well.  Then add crushed chips and stir until the chips are mixed in.  Serve immediately or the chips will get soggy.  Enjoy some Midwest-tex-mex!
 

Monday, September 9, 2013

Homemade Rotel


It seems that Rotel has been popping up in more and more recipes on my Pinterest board.  Of course, when I want to share with you some of the ones we've liked, I draw a blank with the exception of this one.  But really, Rotel is in everything lately.  I wasn't sure how it was much different than a can of diced tomatoes with green chilies.  Until I made my own.

Oh my.  This is ever so much better than diced tomatoes and green chilies.  It's way, way better than canned Rotel.

There's no way I'd take credit for making this up.  I learned how to make it from the Canning Granny blog, and that gal's a genius.  Today I made a small batch to use up some of the final offerings of our summer garden, but I made a larger batch a few weeks ago.  Already I'm scheming extra raised beds next summer so I can fill my pantry up with jars of this....


I've found that canning tomato products really comes down to the spices you put into them and the quantity of the same staple produce used.  Like salsa, Rotel is composed of tomatoes, jalepenos, onions and peppers.  


Apple cider vinegar, sugar and salt are also added.  I think some of the difference between Rotel and salsa is in those ingredients.


Rotel tastes more stewed, more savory.  And it cannot be understated how amazing it is on tortilla chips when stirred into melted cheese.  Out of this world.  And I'm not even a chips and dip girl.

If you've got tomatoes still left on your vines, or if your co-worker is trying to get rid of his...or even if you have to make a run to the grocery store--this is worth your time!

Homemade Rotel
Taken directly from the Canning Granny blog

About a gallon of tomatoes.  (I used Romas)
2 large peppers (green, red, yellow or orange)
1 large onion (I like Vidalias)
8 jalepenos
3/4 cup apple cider vinegar
1/4 cup sugar
1.5 T canning salt
6 tsp lemon juice

Bring a large pot partially filled with water to a boil.  Add tomatoes and cook for about a minute.  Quickly drain hot water, then dump tomatoes into a bowl of ice water to 'shock' them.  Peel the skins from the tomatoes, then dice into pieces and put back into the empty stock pot.  Dice green peppers and onions and move into stock pot with tomatoes.  Dice jalepenos, removing ribs and seeds for more mild Rotel, then place into stock pot.  Add sugar, salt, and vinegar into the pot, then place on stovetop and bring the mixture to a boil.  Reduce heat to medium low and simmer for 45 minutes.  Sterilize jars, then add one teaspoon of lemon juice in each.  Ladle hot Rotel into each of the jars, leaving about an inch of headspace at the top.  Tightly screw on lids.  Process jars by placing them in boiling water for 15 minutes.  Remove and allow to cool completely.  The lids on the jars should pop, indicating a good seal.  Store in a cool dark place like your pantry.

Serving suggestion;  In a microwave save bowl melt a small block of Velveeta cheese.  Stir in a jar of your homemade Rotel.  Serve with tortilla chips.  Enjoy!  


Sunday, September 8, 2013

Caramel Apple Crisp

I hate winter.  I really do.  So while most people are anxious for fall--the colors, the beautiful weather, the football--I just can't overlook the fact that fall is one step away from winter.  It's hard for me to get excited about that.

What I can get excited about, though, is apple season.  

I love to wander through the little metal-building-apple-shop at our favorite orchard, looking at the big bags of apples, checking out the different honeys, butters, pies, crisps, and samples.  What I have loved this year, even more, is the unexpected apples that showed up on our apple bushes.

Yep, bushes.

When we first bought our acreage, even before our house was built, we planted a few Haralson trees--my favorite variety.  That winter some hungry rabbits hopped along top of the big banks of snow around them and chewed off the tops of every single one.  What happens when you chew off the tops of trees?  They come back as bushes.  That was seven years ago, and those bushes have just sorted of existed.  Until now.  When strangely, one of them produced a small crop of apples.


Weird, right?  But hey, we'll take it!

With seven Haralsons and three Galas from the grocery store, I had ten cups of diced apples.  Just the right amount for our favorite apple crisp.  What makes it extra good?  Brown sugar instead of white...


and ice cream.  EVERYTHING is better with ice cream.


I toss the apples in a pot with cinnamon, brown sugar and ice cream and heat it until the ice cream melts.  It coats the apples in heavenly goodness.  

   
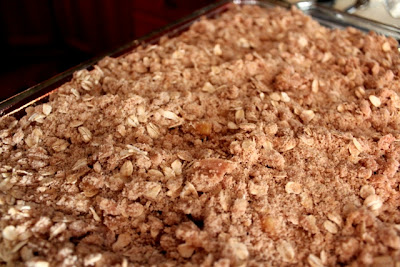
I prefer crisps with oatmeal.  More brown sugar, cinnamon and butter, plus a little white sugar go in...

Then some caramel drizzled on the top after it comes out of the oven.  Oh yeah... 


At this point, our house smells like glory.  


You could enjoy it just like this.  

But why not send it right over the edge and add a scoop of vanilla?  

With a little more caramel on top, of course.


It almost makes the thought of impending winter bearable.

Almost.

Caramel Apple Crisp
My own.
 
10 cups diced apples (8-10 apples, depending on size)
1/2 cup brown sugar
1/2 cup vanilla ice cream
1 T cinnamon
----------
1 stick (half cup) butter, melted
1.5 cups flour
1.5 cups old fashioned oats
1/2 cup brown sugar
1/2 cup white sugar
1 T cinnamon
----------
caramel sauce (your own or from a jar)
 
Preheat oven to 350 degrees and spray a 9 x 13 pan with nonstick spray.  Peel and dice apples, then place in a large pot.  Top with brown sugar, vanilla ice cream and cinnamon.  Heat on medium low, stirring until ice cream melts and sugars coat the apples.  Pour into prepared 9 x 13 pan.  In a separate bowl, whisk together oats, flour, brown and white sugars and cinnamon, then pour in butter.  Combine until crumbly, then spread evenly over the diced apples.  Bake for 40-50 minutes, until top is browned.  Pour caramel sauce as desired over the hot mixture, then allow to cool at least an hour.  Serve with a scoop of vanilla and additional caramel sauce, then enjoy!