Showing posts with label In the Garden. Show all posts

Saturday, October 26, 2013

Pumpkin Cinnamon Rolls


I figure I have between now and November 30th to use up the ridiculous amount of pumpkin I've got.  Pumpkin is for fall, and December 1st marks the definite shift to "Christmas season."  Pumpkins aren't for Christmas.  

This season we've had everything from pumpkin scones to pumpkin bars to pumpkin cookies.  I've even made my own pumpkin pie seasoning.  This recipe for pumpkin cinnamon rolls found its way into my Pinterest feed, where it was promptly pinned and made.  

Yu-um.  They were so scrumptious I made more of the dough, but froze it after I cut it into slices.  On Thanksgiving morning when we have lots of family here, I'll put them in my biggest rectangular baking pan, let them rise that last time, bake them, and slather them with frosting.  Way faster than starting them from scratch  I'm smart that way.  

Especially because starting them from scratch, for me, meant grabbing a pumpkin off of my front porch.  Instead of the baking method, I scooped out the seeds and cut the pumpkin into wedges where I boiled it until it was soft.


When I say from scratch, I really mean it!  The pumpkin gets mixed with a yeast-water mixture, scalded milk, egg, sugar and some butter.


Expected dry ingredients - flour, salt and spices - are mixed in and the dough is kneaded for about five minutes by the fabulous KitchenAid.

Long story made short: it rises, gets punched down, then rolled out to about a 15 x 10 rectangle.  A lot of butter is poured all over it.  


Then a lot of sugar, brown sugar, cinnamon and pumpkin pie spice is sprinkled over the top.


You know these naughty ingredients are why the cinnamon rolls taste so good.


Here's a tip for you.  You could cut the roll into pieces with a knife, but it will squish down the rolls.  Instead, grab up some dental floss.  Then do this.


Fun, right?  My kids are forever finding interesting uses for dental floss.  I impressed them with this one.


(FYI, I put the second batch into the freezer at this point).  

If you're baking them, not freezing them, let them rise a second time, give them a turn in the oven, and this happens.


Right?  Cinnamon rolls.  Pumpkin cinnamon rolls.  I pretended I was a school lunch lady and served them with chili at supper time.  They made terrific breakfast food before school the next morning.


Since I didn't alter the recipe I used for the rolls or the frosting, I'm going to share the links to them below.  I would have used the maple cream cheese frosting the pumpkin cinnamon roll recipe called for, but we have a cream-cheese-hater here.  The brown sugar frosting was super, though, and I'd recommend it!

Pumpkin Cinnamon Rolls
Brown Sugar Icing

Sunday, October 13, 2013

Pumpkins and Kisses Blondies


I'm on a mission to use up the bountiful pumpkin harvest we had this fall.  Every time someone comes over I try to fob off a few, because my freezer is full and there's no way we can possibly use all of these little guys up.


In the meantime I'm baking pumpkins left and right.  I pinned this recipe the other day, and used it as my inspiration for these fall-inspired blondies.  I don't really get into all of the recipes that heap candy after cookie after chocolate chip into a single recipe, but I knew with some refining they had promise.

They did.

WOW.

Amazing!  I'll be immodest here and say I made a production of patting myself on the back when we dug into these.  They were genious!

Here's the play-by-play: 

I grabbed up a pumpkin off of my front porch, washed it, cut it in half, scooped out the seeds, roasted the halves until the flesh was soft, scooped out the flesh from the rind and mashed the flesh.  If you don't have a baking pumpkin on your porch, just grab a 15 oz can of pumpkin puree.


While you're scooping and mashing, put butter and the sugars into your KitchenAid and let it whip for a good five minutes so it's light and fluffy.


Add the other wet and dry ingredients for the blondies, and then this happens.


Pumpkin Spice Kisses.  Oh yeah.  Mmmm-hmmmm! Seasonal Kisses.  I'm partial to the mint ones at Christmas time, but these definitely come in a close second.  They get chopped up into big pieces and added to the dough with some chopped pecans.

 
About 2/3 of the dough gets baked for ten minutes in a 9 x 13 cake pan, and then a whole bag of caramels, melted with some evaporated milk, gets poured on top.  That caramel-y goodness is topped with the other 1/3 of the dough.  Like a pumpkin blondie sandwich.  


Definitely my kind of sandwich.  The texture is just like a super good brownie--thick and chewy--with bright cinnamony-sweet kicks from the Kisses and nutty goodness from the pecans.  The pumpkin pie flavor brings it all together.  It's so good.  

And you could always do this to it, too.

  
So stop in at my place and pick up a pumpkin (or five).  Then dash to the store to pick up a package of Pumpkin Spice Kisses (or five).  You won't be sorry you did.  (And neither will I).

Pumpkin and Kisses Blondies
Adapted from Loaded Caramel Pumpkin Blondies

2 cups all-purpose flour
1/2 cup graham cracker crumbs
1/2 tsp baking soda
1/4 tsp salt
2.5 tsp pumpkin pie spice
1 cup softened (not melted) butter
1 cup brown sugar
1/2 cup white sugar
1 egg
1 tsp vanilla
2 cups mashed pumpkin (or a 15 oz can of pumpkin puree)
30 Pumpkin Spice Hershey Kisses, chopped
2 oz pecans, chopped
1 bag (11 oz) caramels
1/3 cup evaporated milk

Prepare the pumpkin if you are using a baking pumpkin.  If you aren't, skip that step.  

Preheat your oven to 350 degrees.  In a mixer, vigorously beat the butter and sugars for about five minutes, until it is light and creamy.  Add the pumpkin, egg, and vanilla, beating until well incorporated.  In a separate bowl whisk together the flour, graham cracker crumbs, baking soda, salt, and pumpkin pie spice.  Add the dry ingredients to the batter and mix until combined.  Add the chopped Pumpkin Spice Kisses and pecans, then gently mix until combined.  

Spray a 9 x 13 baking dish with nonstick cooking spray.  Spread 2/3 of the dough in the bottom of the pan and bake for 10 minutes.  While that is baking, unwrap the caramels into a glass bowl and add the evaporated milk.  Microwave the caramels for a minute, then stir.  Microwave in additional increments of 30 seconds, removing the caramels when they are melted.  Pour the melted caramels over the brownie batter and allow it to sit for about five minutes to firm up a bit.  Then blob (yep blob) the remaining 1/3 of the dough evenly over the top of the caramel.  Spread gently so you don't disrupt the caramel.  Bake for another 30 minutes.  Remove from the oven and allow the blondies to cool.  Then enjoy! 


Sunday, September 8, 2013

Caramel Apple Crisp

I hate winter.  I really do.  So while most people are anxious for fall--the colors, the beautiful weather, the football--I just can't overlook the fact that fall is one step away from winter.  It's hard for me to get excited about that.

What I can get excited about, though, is apple season.  

I love to wander through the little metal-building-apple-shop at our favorite orchard, looking at the big bags of apples, checking out the different honeys, butters, pies, crisps, and samples.  What I have loved this year, even more, is the unexpected apples that showed up on our apple bushes.

Yep, bushes.

When we first bought our acreage, even before our house was built, we planted a few Haralson trees--my favorite variety.  That winter some hungry rabbits hopped along top of the big banks of snow around them and chewed off the tops of every single one.  What happens when you chew off the tops of trees?  They come back as bushes.  That was seven years ago, and those bushes have just sorted of existed.  Until now.  When strangely, one of them produced a small crop of apples.


Weird, right?  But hey, we'll take it!

With seven Haralsons and three Galas from the grocery store, I had ten cups of diced apples.  Just the right amount for our favorite apple crisp.  What makes it extra good?  Brown sugar instead of white...


and ice cream.  EVERYTHING is better with ice cream.


I toss the apples in a pot with cinnamon, brown sugar and ice cream and heat it until the ice cream melts.  It coats the apples in heavenly goodness.  

   
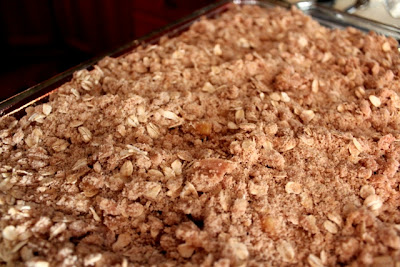
I prefer crisps with oatmeal.  More brown sugar, cinnamon and butter, plus a little white sugar go in...

Then some caramel drizzled on the top after it comes out of the oven.  Oh yeah... 


At this point, our house smells like glory.  


You could enjoy it just like this.  

But why not send it right over the edge and add a scoop of vanilla?  

With a little more caramel on top, of course.


It almost makes the thought of impending winter bearable.

Almost.

Caramel Apple Crisp
My own.
 
10 cups diced apples (8-10 apples, depending on size)
1/2 cup brown sugar
1/2 cup vanilla ice cream
1 T cinnamon
----------
1 stick (half cup) butter, melted
1.5 cups flour
1.5 cups old fashioned oats
1/2 cup brown sugar
1/2 cup white sugar
1 T cinnamon
----------
caramel sauce (your own or from a jar)
 
Preheat oven to 350 degrees and spray a 9 x 13 pan with nonstick spray.  Peel and dice apples, then place in a large pot.  Top with brown sugar, vanilla ice cream and cinnamon.  Heat on medium low, stirring until ice cream melts and sugars coat the apples.  Pour into prepared 9 x 13 pan.  In a separate bowl, whisk together oats, flour, brown and white sugars and cinnamon, then pour in butter.  Combine until crumbly, then spread evenly over the diced apples.  Bake for 40-50 minutes, until top is browned.  Pour caramel sauce as desired over the hot mixture, then allow to cool at least an hour.  Serve with a scoop of vanilla and additional caramel sauce, then enjoy! 

Sunday, August 18, 2013

Garden Spaghetti Sauce


Let me disclaim that making your own spaghetti sauce is not less expensive than buying it in the store, and it REALLY isn't more convenient or easier or faster.  However, when you see the ingredient list you'll notice there isn't anything secretive like "natural flavor" or other "ingredients that are natural or naturally derived" like this one.  And there's just something amazing about growing your own food, and then making something with it.  

Almost everything in these jars of spaghetti sauce came from our garden--from the tomatoes and green peppers to the basil and oregano.  
Of course, there are things we didn't grow too--like black pepper and salt and brown sugar--but at least those are 'natural flavors' I can identify!  
I debated long and hard this morning about making salsa instead to use up those lovely jalepenos, but the truth is my kids don't like salsa very much.  It looks too much like vegetables.  I like it, but a girl can only eat so much salsa by herself.  Spaghetti, though, they'll eat.  

I wish I could say you just dice up everything you want in your spaghetti and stick it in a pot, but I learned the hard way last year that tomato skin is unappealing on top of pasta.  It rolls off into these noticeable clumps and my kids definitely turn their noses at noticeable clumps.  What am I saying...my kids turn up their noses at tomatoes, much less their peeled rolled skin.  So you've got to boil the tomatoes for a minute, then shock them in cold water, then peel off the skins before you can dice them.  That takes some time.
Though I'm growing green onions and red onions, I didn't grow vidalias so I bought some at the store.  If I lived in Georgia, I'd totally be growing vidalias.
For some reason my red and yellow peppers ended up being green, but it's all good....
 These guys come from the little herb garden right by the patio off the kitchen.
After you boil and peel and dice and chop, it all gets tossed in a big heavy pot with the spices and a bit of tomato paste.
And it cooks for an hour into a lovely sauce like this.
I love those chunks of pepper and tomato, but if I served it like this to my children I'd find those chunks pushed to the edge of their plate when they finished their meal. 

So I'm sneaky.
I use my immersion blender a bit, until most of the chunks are blended in.  Try picking those green peppers out NOW!  (maniacal laughter)  

We take our victories however we can.

I use a wide mouth funnel to get the sauce into jars.  I might have taken 30 pictures of the jars like this.  They just looked so garden-y and fresh, and they smelled so savory and Italian!


Unfortunately I still haven't picked up a big stock pot, so to process them in boiling water for 30 minutes I had to lay them on their sides in the biggest pots I own.  Note to self: buy a stock pot.  I made that note to myself last year, too.

It isn't 'correct' but it still works.  

Case in point:
Spaghetti sauce.  This winter when I use this jar, I'm going to think about my summer garden.  It will help get me through February in Iowa!

Spaghetti Sauce
My own creation!
 
12 cups tomatoes - peeled and chopped (I used Romas)
2-3 cups green, red, or yellow peppers
3 cups sweet onions
2 T chopped garlic
fresh oregano and basil to taste (I used about 15 leaves of basil, and pulled the leaves off of about 10 branches of oregano)
24 oz tomato paste
1/3 cup brown sugar
2 T salt
2 T vinegar
1 T black pepper

Wash all vegetables.  Boil water in a large pot, then add in tomatoes and allow to boil for about a minute.  Transfer the tomatoes to another large bowl of ice water, and the skins should peel off pretty easily by hand.  Then dice the tomatoes into small pieces.  Dice the peppers and onions, and mince the garlic, oregano and basil.  In a large heavy pot, add the diced vegetables and all other ingredients.  Stir and bring to a boil, then cover and simmer for one hour.  If you wish, use an immersion or other blender to incorporate the vegetables if you have picky eaters, or leave the vegetables chunky as they are.  

Using a wide-mouthed funnel, ladle sauce into clean, hot jars, leaving about an inch of space at the top.  Add lids and secure with rings.  Place the jars in a large pot, covering completely with water.  Bring the water to a low boil and process the jars for 30 minutes.  Remove and place on wire cooling racks.  You should hear the lids "pop" as they seal.  When they are entirely cool, store as you wish.


Monday, May 27, 2013

Home Alone


It was a dark and stormy night.  And day.  And night.  And day.  And night.  And day.  As in, we got about ten inches of rain in three days.  As in, crazy thunder and lightening and losing power.  That's pretty much the sum of my staycation over Memorial Day weekend.  I was all by myself in scary storms for three days.  Home alone.  Alone.  By myself.... 

Working mothers out there, do you hear me?  I was home.  Alone.  By myself.  Uh huh.  

It's not that I don't want to be with my family.  They went to North Dakota to help my brother build a second garage.  I really wanted to see my brother's family.  I really wanted to see my parents.  I love to spend time with my kids.  I love to sit quietly by my husband on long car trips, when he drives and I hold his hand and just think.  But unfortunately we couldn't find anyone to look after the farm, and one of us had to stay home.  Since running power tools falls more into Dan's skill set than mine, I volunteered to stay home and do chores.  

Now, if it would have just been the dogs, we could have found somebody to help us out.

  
Honestly, look at those brown eyes.  Anybody would have been happy to care for her if we all went away.  She's no trouble at all.  In fact, when the weather got a little dicey, THREE nights in a row, she helped me to hold down the bed.  Such a protector, that girl.

And this guy?  He was saving me from rabid squirrels and scary sparrows left and right.  He totally even chased them up trees.  Who wouldn't want a boy like this for a long weekend?

  
The cats aren't much more trouble.  We might have been able to find someone to come out to feed them.  In fact, they can generally feed themselves. 


(I know, I know, I was cringing as I was racing to grab the telephoto lens....)

Generally the cats just chill and love.  This guy?  He's Romeo.  


He's a lover, not a fighter.  He braved puddles to make love to my leg.


And they all look out for the baby ones, so anyone watching our place could have just let them babysit each other.


The horses didn't need anyone to come out.  The torrential rains have produced abundant grass in our pasture.


Not that they would turn down grain, mind you.  But no caretaker was needed for them.


We didn't even need anyone to come out to water the yard or the plants, because.....well, the days and nights of torrential rainfall...


Why, then, did I spend three days home alone?


Yep.  The chickens.


And the turkeys.  (Dear God).  No one in their right mind wants to help do our poultry chores.


Thankfully Cooper, the bird dog, helped me keep them in line.  


I was actually pretty proud of myself.  Wearing big leather gloves, I even grabbed two eggs from underneath a roosting hen.  And I worked myself down to only one scream in the chicken coop by the last day.  I was leaning down to try to grab a water dispenser from a group of absolutely insane teenaged chicks and my hoodie touched my neck.  It felt like a chicken touched me.  Whew.  Close call.  The insane chicks really loved it when I screamed.


I spent three days at home, by myself, while my family went off and had fun, so I could take care of chickens.

God bless our chickens, every one.