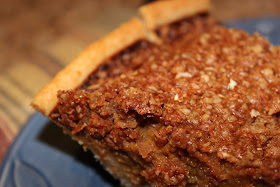
Sometimes I wonder about the person who coined the phrase "easy as pie." Maybe the person who had no qualms about using a premade pie crust, dumping a can of pie filling in it, then calling it good? Sometime in the last few years I've gone from preferring to make my own everything, to having somewhat of an aversion to anything premade or processed by a manufacturer. There will be no premade pie crusts in this house.
In the past, before the era of the KitchenAid mixer and the Cuisinart food processor, I avoided making pies because I can't stand the sticky, floury mess on the counter caused by rolling pie crust. But then I did get the mixer and the food processor.
And then I had a stroke of genius. Granted, I'm sure I'm not the only person who has thought of this, but still. Instead of coating my countertop with flour, I cover it with some saran wrap.
Then I plop the dough onto the saran wrap and cover it with another sheet of saran wrap.
Then I roll. It's genius. No mess anywhere.
From here it's a total cinch to get it into the pie plate. I peel off that top layer of saran wrap and let the pastry fold in the center (not in so the pastry touches itself, but out so the wrap touches itself. I lay the half on the pie plate, then unfold the dough, then peel off the other layer of wrap. Like so:
Easy peasy, right? No muss, no fuss. And it tastes like you made a big flour-y mess all over your counters.
I need to use up all of the pumpkin saved in my freezer from last fall before we start growing more pumpkin. I really would have loved to make some kind of pumpkin and cheesecake layered pie to fill this lovely pie crust, but the child who loves pumpkin loathes cream cheese, and I swear he can taste it in anything. So I just went with a pumpkin pie that has a light crumb crust on the top.
In the spirit of being as manufactured-processed-free as possible, I also used eggs from our hens. The side benefit being that we have egg cartons full of these puppies taking up an entire shelf in my refrigerator, so using them up is always good.A few turns in my handy dandy Cuisinart...
......and walla!
Of course I forgot to take pictures of making the crumb topping, but I describe it in the recipe below. If you go that route, you'll end up with pumpkin pie with a crumb crust. Kinda like this one.
YUM. In case you've been inspired to try this 'easy as pie (crust)' approach, here is the recipe.
Pumpkin Pie With Crumb Crust
Pie crust:
2 c all-purpose flour
1 tsp salt
2/3 c shortening
6 - 8 T ice water
In your Cuisinart (or whatever), combine the flour and salt. Add the shortening, and pulse until the mixture is crumbly. Add in the water and combine until a ball of dough forms. Roll out however you like, but I'd recommend the saran wrap approach!
Pumpkin filling:
2 cups pumpkin
2 eggs
3/4 cup brown sugar
12 oz evaporated milk
1 T flour
2 tsp cinnamon
1/2 tsp allspice
1/2 tsp ground ginger
1/2 tsp salt
Wipe down your Cuisinart bowl (or get a fresh bowl, or use your food processor, or whatever!). Combine all ingredients and blend until smooth. Pour into the prepared uncooked pie crust.
Crumb topping:
1/3 cup old-fashioned oats
1/3 cup brown sugar
1/2 tsp ground cinnamon
1/2 tsp nutmeg
2 T cold butter
1/3 cup chopped walnuts
Wipe down your Cuisinart bowl (or whatever!). Add all crumb topping ingredients and pulse until the butter is well incorporated. This tends to pulverise the walnuts, so if you'd prefer the walnuts be more chunky, add them after you've incorporated the butter. Sprinkle over the top of the pumpkin filling. Bake at 400 degrees for 15 minutes, then reduce the temperature of your oven to 350 and bake for another 50 to 60 minutes until the pie is set. Mine came out of the oven in a dome shape, but settles down nicely within a few minutes as it cools. Though this is good warm with whipped topping, I prefer it after it refrigerates for a while and is cold. In fact, I think it's best after it sits in the refrigerator for a day. However long you can stand to wait before digging in, I guess! Enjoy!


No comments:
Post a Comment