Sunday, November 25, 2012

How to Make an American Quilt for a Soon-to-Be Columbian-American Girl


My sister and her husband Chris are adopting a niece for me.  It's the second time my sister has taken one for the team and brought me home a niece from another country.  

My sister is great like that.  

Our niece Zahria was adopted from Kazakhstan, and her new little sister is coming to our family by way of Columbia, South America.  We're calling her our little Columbian Bean until she's in the country and everything is all legal and stuff.  Dang that Hague Convention, anyway.

Before Zahria came home I made her a small quilt, which has been well-loved in the past five years.  Lil' Bean needs a quilt of her own, so Z helped her mom pick out some material and they sent it my way.  Zahria chose the cupcakes, which is the sweetest but also proved to be the most maddening to work with.  More on that later.  In any case, I decided on a simple square pattern and kind of made things up as I went along.  In case you have a sweet little one headed to your family and you feel like putting your love into fabric-form, some rudimentary instructions follow.


My sister sent 9" by 44" of the cupcake fabric and 18" by 44" of the dot, blue owl and yellow fabrics.  She also sent a length of bright pink which I used for the border and backing.  I forgot to measure that for you before I used it--sorry.  Go with two yards.  All of the fabrics were flannel, though that cupcake was a different type than the others, almost like a pajama-knit-flannel.  Try to get the same type/thickness of each of the fabrics, and avoid stretchy fabric like the plague.  You will thank me for taking that advice.  More on that later.

Because of the amount of fabric I had, I needed to cut my squares into 4.5 by 4.5 inch pieces.  It would be easier for you to just go with 5 by 5, but you roll with whatever works for you.


If you don't own a rotary cutter, a cutting mat and a plastic ruler-thingy, I would strongly recommend buying them before taking on any quilting project.  You can buy them at Amazon.com here, or in any fabric store.  Walmart even carries them.  

When cutting fabric, it is simplest to first cut strips that are 4.5" wide, and then cut each strip into 4.5" pieces.  You can find directions all over the internet for how to cut strips, including videos.  You might start with this one.


You should end up with stacks of squares.  Feel free to iron them at this step, but I didn't. 
 

Now comes the step that took me forever.  Not really, but I spent a lot of time on it.  Arrange the squares however you would like.  For Zahria's quilt, which was primarily chenille, I randomly placed squares.  I know random sounds like it would take the least amount of time, but it didn't because I didn't want two of the same type of squares touching.  The randomness took a lot of planning.  But I'm bad at random, so maybe that was just me.  I ended up with this design for Lil' Bean's quilt, which was 9 squares by 11 squares, for a total of 99 squares.  (Those are my mad math skills coming through there).  You could certainly go larger; there were quite a few unused squares from this project.  Since this quilt is for snuggling in the car, in the rocking chair, and on aunties' laps, I wanted a smaller size.


There is an efficiency to quilting squares, and if you follow the logic it will save you a ton of time and frustration.  Do this.  Flip the second column of squares onto the first column of squares.  Then starting at the bottom, stack each set so the top squares are on the top of your pile.

When you sew the right edge together, begin sewing the top two squares but then DON'T stop the sewing machine or cut the thread.  Pretend you are in an assembly line in a sweatshop somewhere, and sew the second set of quilt squares with just a small space of thread between them without stopping the machine.  A huge time saver.  


See what I mean?  You'll end up with a connected group of squares.


Snip them apart and stack them, keeping the bottom set on the bottom and working your way up to the top.  That order is important.  If you forget it, your pattern is going to be way off and you'll end up with a random quilt, even if you hadn't planned on one!


Go back to the quilt squares arranged on your floor.  Starting at the bottom again, stack the next column of squares.


Arrange them at your machine so the sewn pairs are next to the squares from the next column.  Again, notice that the top squares are on top.


Open up the sewn pair and lay the solo square on top of the right side, "good" (printed) sides touching, lining up the edges.  


Now sew that third column of squares onto the second column squares.  Again, do not stop your machine between squares.  Repeat those steps, sewing all of the columns of squares to make your rows.


When all of the rows have been sewn, you will need to iron the seams.  This is really super important because this little trick is going to help your squares "lock" so the edges are perfect.  Or it will if you do not have cupcake fabric.  The cupcake fabric STRETCHED insanely when I ironed the seams.  That meant all of my squares were 4.5 x 4.5 except those cupcakes, which became like 6 x 4.5 and caused havoc through the remainder of my project.  

Iron row 1 with all of the seams going to the left (raw edges pointing left) as shown above.  Then iron all of row 2 seams going to the right (raw edges pointing right).  Row 3 will go left, row 4 will go right, and repeat through row 11.  Row 11 will be ironed to the left because it is an odd-numbered row.  Holy math skills, Robin.    


You're ready to sew row 1 to row 2.  Put the good sides together, and pin at each intersection of squares.  Notice how the edges "lock" because one seam goes one way and the other seam goes the other way?  That's what you want.  And this is what you don't want:


If your fabric has stretched in the ironing, your corners are not going to meet.  That is maddening.  You'll then be forced to attempt to stretch fabric and fudge tiny little gathers to try to get the edges to meet.  Your squares won't form perfect corners and the quilt will be a dead loss.  Or you'll just have to live with some imperfect corners.  Apparently the Amish (or some such group) say no quilt is perfect because only God is perfect, so if that helps you feel ok with it, then go with that.  I do.


When all of your rows are sewn together, iron the seams between rows in the same direction.


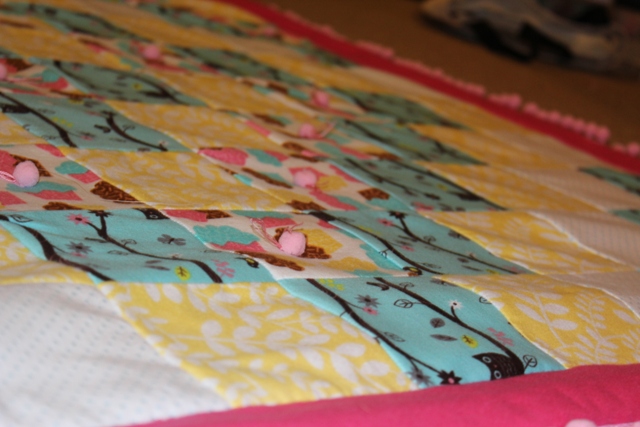
Tada!  You have the quilt top primarily done.  Now to sewn a border onto it.  I cut 3 inch by 44 inch strips of the same fabric I used as backing for the quilt.  As a general rule, do some measuring before you cut.  This worked for me because none of the sides of my quilt were longer than 44".  If you used more than 99 squares, yours might be.  

Pin a strip of border to the left and right sides of your quilt.  


Be certain to pin at each of the seams, ensuring the seams are sewn down in the direction they were ironed.
 

After you sew each strip of border, lay the quilt flat on your ironing surface, then push the border up and iron it flat.


The left and right sides of the border should be sewn on first, then the top and bottom.  

You could stop and bind the quilt at this stage and call it good.  I had to put a little something extra onto Lil' Bean's quilt because I couldn't let well-enough alone.  


I sewed pom pom trim onto the edge of the border.  There was just a small amount of edging on the pom pom trim, so this step was a little tricky.  You can't see it from the pictures, but the edging of the pom pom trim is actually on the RIGHT side.  That was intentional, because when you sew the backing on you will flip the quilt inside out and the pom poms will be sandwiched between the top and back of the quilt, obviously poking out.  It's hard to explain.  Just trust me.  If you are going to sew pom pom trim, sew the edge of the trim so the pom poms are facing into the middle of the quilt and the edge of the trim is facing the outside edges. 


After the pom pom trim was sewn around the edge, I assembled all three layers of the quilt to combine them.  Spread the top of the quilt on a hard surface so the good side is up.  Then lay the backing of the quilt so the good side is down.  (Notice the good sides will be touching).  Then lay your batting on the top.  It's much easier to sew if you use a smooth batting like this one.  Pin everything securely in place.  Trim so the edges are even and you can see all three layers.  Then sew around the outside edge.  You hope to catch the edge of the pom pom trim in that, too, if you can--but it's almost impossible to see it when you're sewing. 


DON'T SEW IT ENTIRELY SHUT or your quilt will be inside out.  Leave a small space (above), maybe 8 inches, unsewn.  Then flip the quilt inside out, so it actually ends up right side out.  Know what I mean?  Your batting should now be on the inside of the quilt, and the top and back are good sides out.  You will need to hand-stitch the 8 inches remaining closed.  


You could call it good at this point, but it's not a bad idea to do some type of quilting to secure the batting inside the quilt so it doesn't shift after washings and repeated love.  I chose to hand-stitch around the border. 


I also cut off pom poms from the left over trim, used pink embroidery floss and secured a pom pom to the center of each of the cupcake squares.


 And then I called it good enough.


Now comes the hardest part.  Waiting the excruciatingly long wait for the paperwork to be accepted that will allow our sweet Lil' Bean to come home.  I can hardly wait to snuggle her, with or without a quilt!

Sunday, November 18, 2012

The New York Times Best Chocolate Chip Cookie Recipe


This past week I had a chocolate chip cookie smackdown between my 'awesome' chocolate chip cookie recipe (the one I've made a hundred times) and the New York Times best chocolate chip cookie recipe.  The NYT recipe is fussy.  It takes two types of flour, weird amounts of ingredients, and the dough has to sit in the refrigerator at least 24 hours before you make cookies out of it.  I've made the recipe twice now, and both times I'm consumed by the thought of the homemaker who developed it.  I'm absolutely sure she was a 'pinch of this' and a 'shake of that' and a 'whatever-you-have-in-the-pantry' kinda gal who had a daughter-in-law who exclaimed "I must have the recipe for this!"  The homemaker MIL probably gave her general directions (oh, a dash of baking powder) and the DIL (who was probably a little OCD like me) likely trailed behind the MIL and measured everything to come up with the exact amounts.  I mean really.  One-and-a-quarter teaspoons of baking soda.  Does that extra quarter of a teaspoon take these cookies from merely good to starring in the New York Times and in every person I know's Pinterest board?  

Maybe.  Because the sad truth is, these cookies won my smackdown.  In fact, by a landslide--unanimously among my family and almost hands-down at work.  And I even took the easy route for parts of the recipe, where I thought it was just ridiculously picky (what in the heck is feves anyway?).


It's possible that these cookies are very good because the recipe does, in fact, call for two different types of flour.  That might be because homemaker MIL didn't have enough of one of the kinds, or it might be something funky with flour chemistry.

 
I blended the dry ingredients, and indeed, it does all look about the same.  This recipe calls for an inordinately long time for beating the butter and sugar.  That might be because homemaker MIL had to step away from her Kitchenaid to pour herself some coffee and take a phone call.  Or, it might just make the mixture particularly light and fluffy.


Typically sugar cookie recipes do call for some time in the refrigerator to harden the dough, but this is the only chocolate chip cookie recipe I've seen that called for refrigeration.  It could be because homemaker MIL ran out of time and couldn't bake them the same day she made the dough.  Or it could be that the long refrigeration time causes all of the ingredients to really do their thing.

 
Ok.  Sidetrack.  When we built our home in 2007, I shopped a ton for granite countertops.  The one I chose was described by the salesperson as "similar to chocolate chip cookie dough."  I guess he was sort of right.  Does it look like my dough is camouflaged here?


Anyway.  The refrigeration makes putting the first batch on the pan less-than-fun.  I use a scooper from Pampered Chef, and it was work to scoop the dough into the scooper.  The subsequent batches are much easier as the dough warms and softens.

Note to self: just get the dough out and leave it on the counter for 10 minutes before trying to scoop it out.


You will note the recipe (below) calls for gigantic-sized cookies.  In the interest of fair comparison for the smackdown, I made both recipes using a small scoop.  Even without the smackdown, I would use the small scoop because it's portion control.  I'm teaching my kids that a hand-sized cookie isn't average.  

But I digress.  You will also note this recipe calls for more than the normal amount of chocolate chips.  Or feves or disks.  Out here in Iowa, we just use chocolate chips.  We aren't fancy or anything.  The extra chocolate was what one tester hypothesized made this recipe better than the other, and she could be right.  I also did not sprinkle the cookies with salt.  I'm not quite sure what kind of accident might have caused homemaker MIL to do that, so maybe she did it on purpose.  I'm not really into the whole sweet-and-salty thing.  This salted caramel everyone is raving about isn't for me.  So we skipped the salt too. 

 
They really do turn out yummy.  Sort of crispy, yet chewy, and definitely full of chocolate.  They made my son smile.  And my coworkers.  So I guess the extra time and effort really was worth it.


The New York Times Best Chocolate Chip Cookie Recipe
Taken directly from the NYT article.

2 cups minus 2 tablespoons (8 1/2 ounces) cake flour
1 2/3 cups (8 1/2 ounces) bread flour
1 1/4 teaspoons baking soda
1 1/2 teaspoons baking powder
1 1/2 teaspoons coarse salt
2 1/2 sticks (1 1/4 cups) unsalted butter
1 1/4 cups (10 ounces) light brown sugar
1 cup plus 2 tablespoons (8 ounces) granulated sugar
2 large eggs
2 teaspoons natural vanilla extract
1 1/4 pounds bittersweet chocolate disks or fèves, at least 60 percent cacao content (see note)
Sea salt.


1. Sift flours, baking soda, baking powder and salt into a bowl. Set aside.

2. Using a mixer fitted with paddle attachment, cream butter and sugars together until very light, about 5 minutes. Add eggs, one at a time, mixing well after each addition. Stir in the vanilla. Reduce speed to low, add dry ingredients and mix until just combined, 5 to 10 seconds. Drop chocolate pieces in and incorporate them without breaking them. Press plastic wrap against dough and refrigerate for 24 to 36 hours. Dough may be used in batches, and can be refrigerated for up to 72 hours. 

3. When ready to bake, preheat oven to 350 degrees. Line a baking sheet with parchment paper or a nonstick baking mat. Set aside. 

4. Scoop 6 3 1/2-ounce mounds of dough (the size of generous golf balls) onto baking sheet, making sure to turn horizontally any chocolate pieces that are poking up; it will make for a more attractive cookie. Sprinkle lightly with sea salt and bake until golden brown but still soft, 18 to 20 minutes. Transfer sheet to a wire rack for 10 minutes, then slip cookies onto another rack to cool a bit more. Repeat with remaining dough, or reserve dough, refrigerated, for baking remaining batches the next day. Eat warm, with a big napkin.

Yield: 1 1/2 dozen 5-inch cookies.

Note: Disks are sold at Jacques Torres Chocolate; Valrhona fèves, oval-shaped chocolate pieces, are at Whole Foods.


Saturday, November 10, 2012

Awesome Chocolate Chip Cookies


I know it's the right thing to do to give recognition to the source of a recipe when it's shared in a blog, but honestly I've had this recipe for so long I have no idea where it came from.  I've had this recipe for three states and five different addresses.  I've had this recipe for four kids.  Two are now teenagers.  (Dear God).  I've had this recipe for so long it's actually written down on a recipe card and not bookmarked in my computer or pinned on my Pinterest boards.  Seriously, I've had this recipe so long that back when I originally wrote it down, I was still inwardly grimacing and letting people call me.....Becky.  Oh my.  


I haven't let anyone call me Becky in years.  So really, I've had this recipe a long time.  And I must have made hundreds of these cookies over the years.  It's bomb proof.  I'm convinced that's because it has a secret ingredient.


Weird, huh?  Pudding.  Sometimes I use vanilla, and sometimes I use white chocolate.  I'm crazy that way.  Honestly I'm not sure anyone can tell the difference, so it doesn't matter anyway.  The pudding in this recipe makes the cookies really soft, and really scrumptious.  I've never met anyone who didn't like them.

Lately a lot of people have been pinning the 'best chocolate chip cookie' recipe published in the New York Times.  I'll blog about that in a few days.  I've made a batch of my "Awesome Chocolate Chip Cookies."  I've made a batch of the New York Times recipe.  I'm going to double-blind taste test with my family and a few coworkers to see which wins the day--the 'awesome' or the 'best.'  

In case you care to treat your family and your office to a taste test of your own, here's my recipe.  

Awesome Chocolate Chip Cookies 
1 c. butter
1/4 c. white sugar
3/4 c. brown sugar
2 eggs
1 tsp. vanilla
1 box instant pudding mix (try vanilla or white chocolate)
1 tsp. baking soda
2 1/4 c. all-purpose flour
1 pkg chocolate chips (you pick which kind)

Preheat your oven to 375 degrees.  Set out two sticks of butter and let them warm to room temperature.  I often forget to do this, and then try to melt the butter a little in the microwave.  That makes this next step turn out not as nice.  So don't be like me.  Put the butter out for a while.

Beat the butter and sugars until they are light and fluffy, about 2 to 5 minutes.  Add the eggs and vanilla and beat until well combined.  Incorporate the pudding, soda and flour.  Try to do that slowly, or all of the powders puff up in the air and get cooking dust all over your food processor.  That always irritates me.  Stir in your chocolate chips.

Scoop the cookie dough onto your cookie sheets in whatever size you like.  


Bake for 8 to 10 minutes, depending on your oven.  I baked mine for 8 minutes, and I probably could have pulled them out at 7.5.  Or 7.35.  Or even 7.25.


These two seemed to think 8 whole minutes was good, though.


Not really a tough crowd, ya know?


Sunday, November 4, 2012

Dessert Pizza


Way back when, back in the days when my husband and I were newly married and still in college, we lived on love and leftovers from his job at Godfather's Pizza.  One 'perk' of working for that particular Godfather's was that employees could eat what they wanted--a definite plus for a 23 year old guy.  We had pizza so often it wasn't even particularly fun or special anymore, and that's saying something!  My husband (who, I must say, no longer cooks anything at all unless it requires an open flame) did a lot of pizza experimentation during that time.  I can vividly recall a pizza with no tomato paste, but instead nacho cheese sauce covered by mozzarella and cheddar, and topped with bacon bits and other assorted things.  It sounds gross, but it wasn't.  Well, I guess it is.  Let me just disclaim that I no longer allow my family to eat anything yellow and processed like nacho cheese sauce...

Anyway.  We don't go crazy with pizza experimentation much anymore.  Greek pizza is definitely as weird as we get.  Our kids like just plain cheese pizza more than any other kind.  Except dessert pizza.  Perhaps dessert pizza is a Midwestern thing.  I wouldn't know because I don't order pizza anywhere outside of the Midwest.  My kids loooooove dessert pizza.  Of course they do.  It's simple carbs, sugar, butter, and cinnamon.  I put apples on this one because hey, any time I can sneak in a fruit or vegetable I do...and apples are one of the only kinds of fruit they will eat.  

If you are interested in sneaking in some fruit between layers of sugar and simple carbohydrates, here's how I did it. 

Dessert Pizza
Pizza crust from Annie's Eats


For the apples:
1/3 cup sugar
2T flour
1T cinnamon
5 apples

To top the dough:
2T melted butter
cinnamon and sugar mixture

Struesel topping:
1/2 cup old-fashioned oats
1/3 cup flour
1 tsp cinnamon
2 T butter

Glaze
1 c powdered sugar
2 T milk
1 tsp vanilla

Prepare the pizza crust as directed by Annie at Annie's Eats.  After the dough has risen and you have formed it into balls to rest, heat you oven and pizza stone to 500 degrees. As it heats, peel, core and dice your apples into small pieces about a half inch in size.  I think it's fun to try to peel the apple in one long strip.  But I'm weird like that.


In a small bowl, mix the sugar, flour and cinnamon together.  Add the diced apples and toss to combine.  Set aside.

On a flat cookie sheet, lay out a piece of parchment paper.  On the parchment paper, press your dough into the shape you desire.  Obviously the larger you make the crust the thinner it will be.  When you have it in the size you want, brush the crust with the melted butter and sprinkle with cinnamon and sugar.


Top the crust with the apple mixture.  In the used bowl, combine the struesel topping ingredients - oats, brown sugar, flour, cinnamon, and butter.  Mix until well combined.  Sprinkle the struesel mixture over the apples and the crust.


Carefully slide the parchment paper with the pizza onto the hot pizza stone in the oven.  After a few minutes you can slide the paper out from under the pizza, but I just leave it there.  Bake for 10-12 minutes, or until the pizza is browned and done.  As the pizza is baking, whisk together the glaze.  Remove the pizza from the oven and drizzle the glaze over the hot pizza.  I dipped the whisk into the glaze, then used the whisk to drizzle.  It's a really technical approach.  I learned it from the Culinary Institute of Small Town Iowa.  Or something.  Once the pizza has cooled enough that it won't burn small fingers, cut with a pizza cutter and distribute to your family.  Or just eat it all yourself.  It's good!